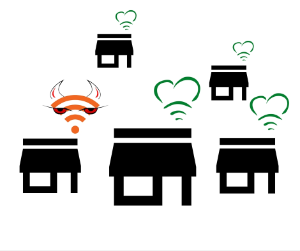
Do you have slow or unstable wifi? Try scanning for channels in use and neighboring networks that create interference. Are You a Good or Bad Wi-Fi Neighbor?
Most wireless routers (and other access points) have functionality that automatically selects a wireless channel for use. Often the channel is selected at startup, and this is one of the reasons why “reboot your router” is such common advice when you have problems with your wireless network.
If you frequently experience such problems that are then resolved by a restart, it may be a good idea to check which channels are in use and optionally select the channel for your access points yourself.
Below we give some advice on choosing a Wi-Fi scanner, explain what to look for in the results of a Wi-Fi scan and present an example of scans from a regular neighborhood.
When Should You Use a Wi-Fi Scanner?
If you are wondering which wireless networks are available where you are, what channels they are using and how strong the wireless signals for each of the networks are, you should use a Wi-Fi scanner.
Try a Wi-Fi scan If you are having problems with:
- Slow or unstable wireless connections in your home.
- Mobiles, computers, or other devices that can’t find the network. Then you can also find more advice in our Checklist when you cannot connect to wifi.
However, if you are looking to measure coverage and signal strength for your own network, you will have more benefit from using a heat mapper. You can find more information about that here: Map your wireless network with a heat mapper.
Choose a Wi-Fi scanner for mobile or PC
In the example below we use the application inSSIDer. It is quite costly, but a simpler, free version exists for Windows.
Free Wi-Fi scanners are available for most platforms. Here are our suggestions:
| Platform | Program | More information |
|---|---|---|
| Windows, Mac OS X | Inssider | |
| Windows | Acrylic Wi-Fi | |
| iOS | Apple AirPort Utility | How to Use the AirPort App for iOS as a Wi-Fi Scanner |
| Mac OS X | Wi-Fi Explorer | |
| Android | Wi-Fi Analyzer |
What Do You Do with the Results of a Wi-Fi Scan?
When you see which channels are being used by other networks, you can change the channel on your own network to reduce interference, primarily on the 2.4 GHz band, where interference and overlap are causing the most problems.
If you see that your own network is on the same channel as many neighboring networks, you can change your setup by accessing the settings for your router or other wireless access point and changing the channel there. Follow the instructions provided by the supplier for your router/access point – how to proceed varies from product to product.
Two rules of thumb for channel selection on the 2.4 GHz band
As far as possible, you do not want other access points nearby that use the same channel.
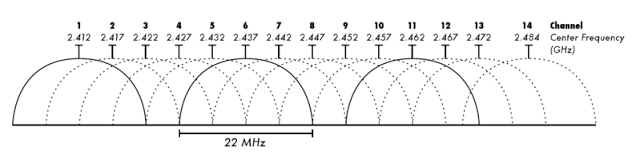
1. Avoid overlapping channels
We recommend sticking to channels 1, 6 or 11 with 2.4 GHz to achieve the best stability, and for all devices to be able to find the wireless network regardless where and when they were manufactured. It is common to adhere to these three channels, although in Norway you can theoretically use all channels from 1 to 13.
This is because:
- Using the channels 2-5 and 7-10 causes overlapping signals with other channels. When everyone sticks to 1, 6 and 11, interference will be handled better than if it were to come from adjacent channels, as they can create interference for a lot of people, as we see in the example below.
- Using channels 12 and 13 is prohibited in several countries, so equipment made for markets other than the European, and some low-cost products may have trouble connecting. See also: Checklist when you cannot connect to wifi.
2. Look at the Signal Strength
You should also look at the signal strength of each network. If there are other wireless networks on the same channel, try selecting a channel where the other wireless network’s signal is 20 dBm weaker than your wireless signal is.
In practice, this will be virtually impossible to achieve everywhere in an apartment or a house if you only have a single access point (usually the router). But if you have multiple access points, they can be placed to cover different areas.
More about wireless signal strength can be read here: Wi-Fi Signal Strength: What Is a Good Signal And How Do You Measure It?
Example: How to Assess Interference and Select a Channel
The picture below shows a scan done in a regular neighborhood with the program inSSIDer. In this example we see that there are many wireless networks on the 2.4 GHz frequency band.
AirTies_Air4920_EI78 is our network in this example. Ideally, this would be the only wireless network in the area, but this is of course quite a far-fetched idea these days.
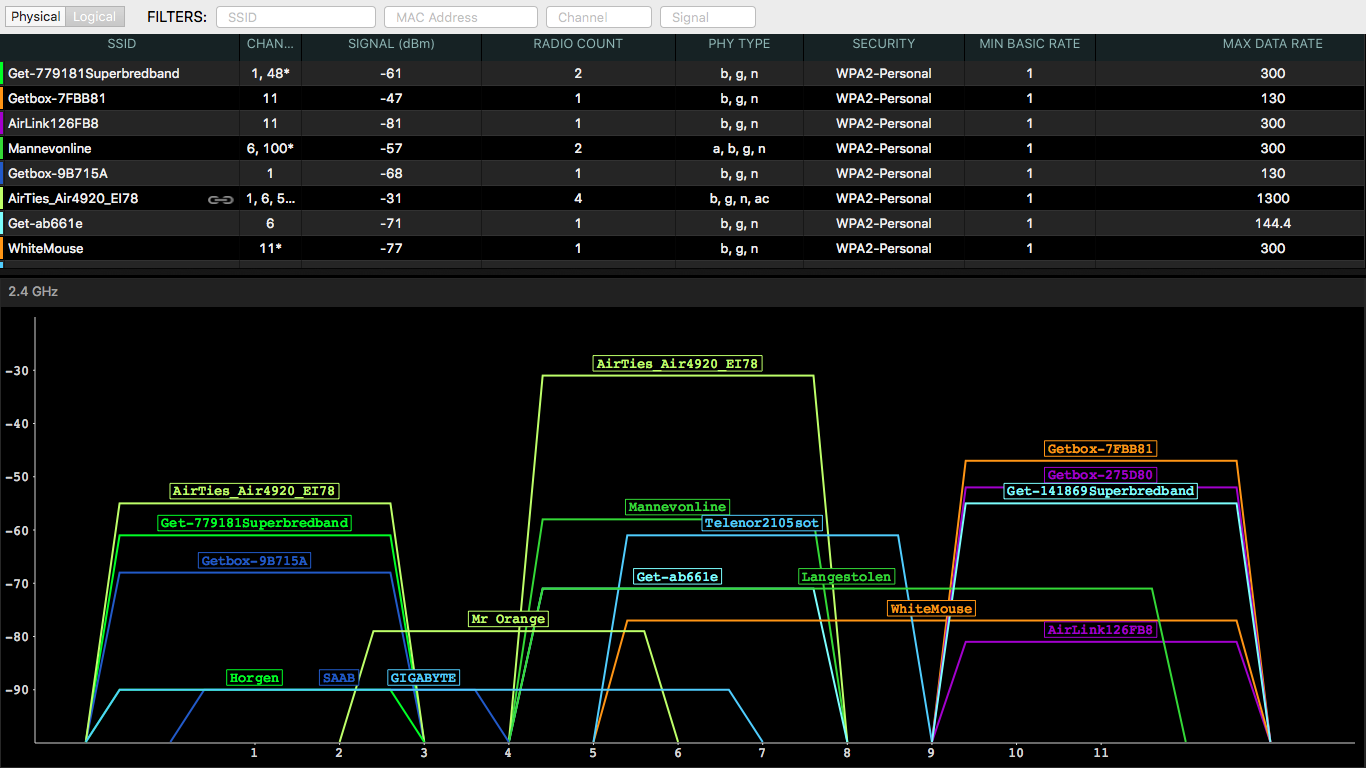
Interference on the same channel
Most networks here are clustered around channels 1, 6, and 11. This is what is called “co-channel interference” – networks on the same channels that interfere with each other. The Wi-Fi standard addresses this, making the networks have to try to adapt to each other, almost like driving in a queue.
Interference on other channels
Another challenge comes from the networks Mr Orange, Langestolen, WhiteMouse, SAAB and Telenor2105sot. They do not use channels 1, 6, or 11, and they therefore interfere with multiple channels simultaneously. This is called “adjacent channel interference”, interference from surrounding channels.
With such noise from others, there is little we can do, except maybe ask the neighbor nicely if they can change the channel for their network – or hope that they read this article!
Noise on adjacent channels is worse than noise on the same channel for Wi-Fi equipment, and the experience is probably better for everyone if they also adhere to channels 1, 6 and 11.
In addition, we see that Whitemouse and Langestolen are much wider than the other networks, this means that they are running 40 MHz mode on their routers to get higher speeds. This gives them a larger transmission area, but also makes them more susceptible to interference from adjacent channels – and these networks are probably quite unstable.
Choosing the Best Wi-Fi Channel
So which channel should we use? Please note that this only shows a scan run from a single location in the apartment – ideally you should measure in different locations and select channels based on where you use the wireless network.
Based on this scan, we reach the following order of priority:
- Channel 6
- Channel 11
- Channel 1
Channel 1 is our last choice because there are many other networks using it that have about the same signal strength as ours and will steal airtime.
Channel 6 admittedly has several networks on adjacent channels that interfere a little for us, but as long as our signal is as much stronger as it is here, this should still work well. It is also a plus that there is only one single other network on the same channel here (Mannevonline).
Channel 11 has more networks than channel 6, but fewer than channel 1 – the question is whether our network will have a stronger signal than the others that are already on channel 11 if we move there.
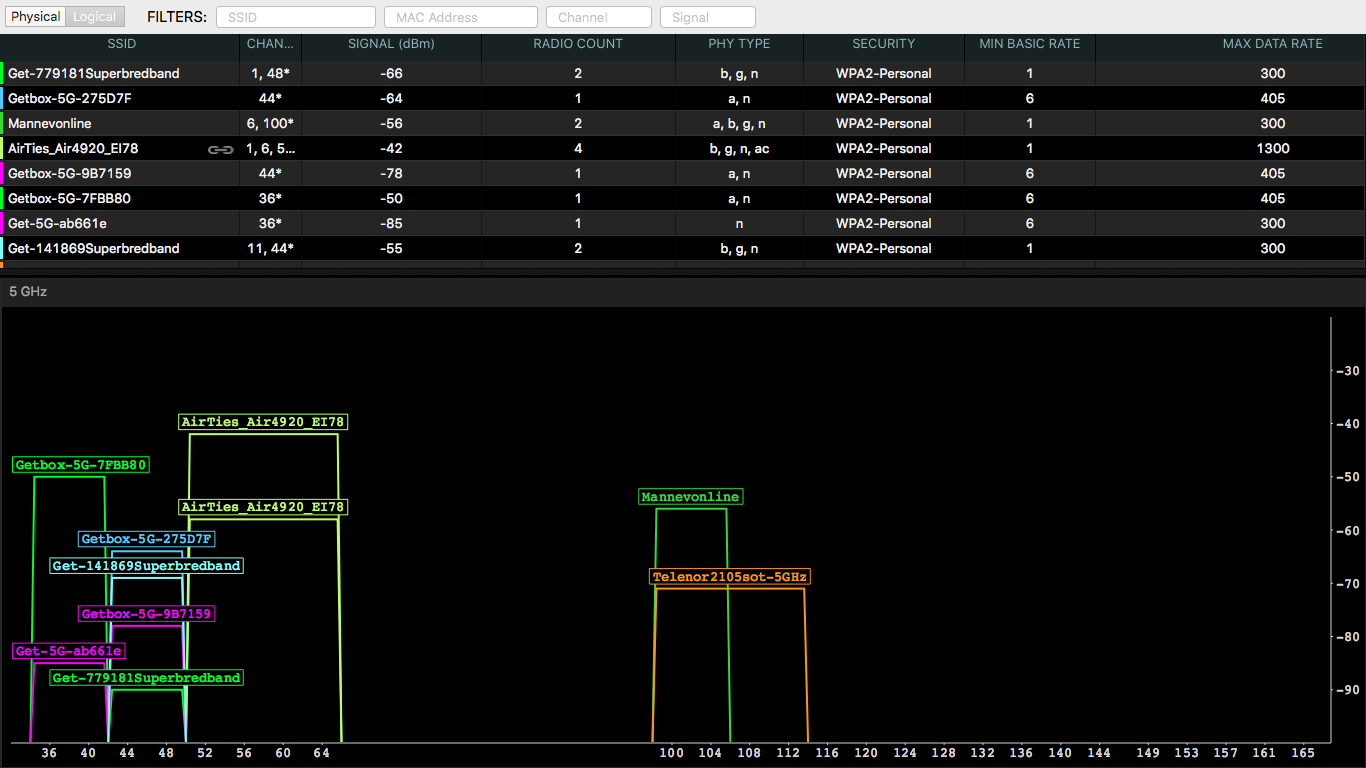
Space to Play Around on the 5 GHz Band
As always, we recommend: Use the 5 GHz network as much as possible, assuming you have a router / access point and devices that support it.
The picture below shows that there is currently plenty of space and free channels on the 5 GHz network. Here it is far less important – in most cases, totally unnecessary – to control the channel.
Article by Jan Pedro Tumusok and Jorunn Danielsen