
A mesh network ensures good wireless coverage and capacity throughout your home, as long as it is installed correctly and each mesh node is well placed. Here are our best tips for planning and implementation.
This is a general guide to getting the best possible placement of devices in your mesh network. It can also be helpful in planning how many devices/nodes you need. It does not replace specific installation guidance from your wifi equipment vendor.
Most wifi providers also have their own apps, which can often help you quality assure the placement of your mesh nodes and troubleshoot any issues that may arise. We recommend installing and using your provider’s app for all that it’s worth.
1. Start With The Main Device And Cables
Regardless of which mesh solution you choose, at least one device must be connected to the internet with a network cable (Ethernet cable). From now on, we will call this the main device.
- If your router or gateway has built-in support for the mesh devices you’ve got, this is your main device.
- If not, you will need to connect a mesh device by cable to your router/gateway according to your provider’s instructions. This mesh device then becomes the main device.
If you have multiple Ethernet outlets in your home, you can get an even more stable network and faster speeds by giving multiple mesh nodes wired access to the internet. Fewer devices will then use the wifi resources.
An additional wired mesh device does not need to be within wireless coverage of the other nodes, but you may of course experience poor or no coverage in areas between those nodes. The option of having an additional wired device is especially useful if you want to include, for example, a garage or garden shed in the mesh network.
2. Plan Before You Place
Where in your home is good wifi most important? Are there parts of your house where you’ve had problems with coverage in the past? If you take away only one thing about mesh networking, please let it be this:
Do not place nodes where coverage is poor. Each mesh node must be within the area where another node provides good coverage.
A mesh node placed in poor coverage provides unreliable performance for those connecting, and can weaken the network as a whole.
Plan your network based on the main device. At least one of the other nodes must be placed within its coverage area.
So where is the coverage? Most routers and access points today do not have visible, directional wifi antennas, but antennas placed around the device on the inside that spread the coverage in all directions.
Rules of Thumb for Mesh Coverage
There are no absolute rules, but you can take this as a starting point:
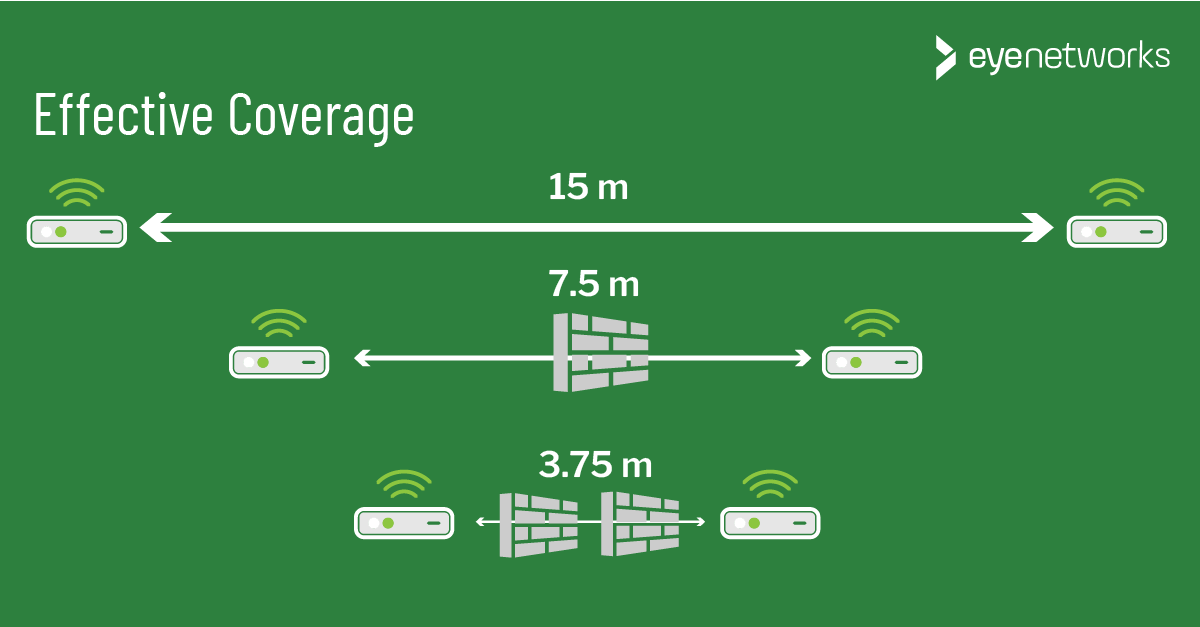
- With a clear line of sight, that is, if there are no walls or other obstacles, the range for effective coverage is approximately 15 meters on the 5 GHz band.
- You should therefore place nodes a maximum of 15 meters apart.
- For every brick or concrete wall that the signals have to pass through, you can cut the range by half.
The margin of error here is around 30%, and a lot depends on building materials, furniture, and so on, but in total, you should expect the signals from each node to reach through a maximum of two concrete walls and one ceiling/floor in each direction.
Go Around The Obstacles
If you have large, physical obstacles to wifi in your home, such as water-based heating, a metal bathroom, or a brick fireplace, you also need to take this into account when placing your mesh nodes. (For more examples of obstacles, see 10 Things in Your Home That Block and Interfere with Wifi).
A triangular formation of mesh nodes can be an effective way to work around such obstacles and between floors.
Placing a mesh node near an exterior wall, however, can be quite wasteful—unless you want coverage outside, for example on a terrace or balcony.
4. Place Each Mesh Node High Up, Centrally, And Clear Of Obstacles
To get the most out of each device, the same applies to all wireless access points and routers:
- Place all devices as high up and free of obstacles as possible.
- Wifi devices should never be placed behind the TV or other electronics, or large physical obstacles in general.
- Wall mounting brackets can be useful if there is no available furniture to place the unit on where coverage is most favorable.
5. Quality Assure Your Results
Once all nodes are placed and added to the network, it might be a good idea to do a final check with your wifi provider’s app or a wifi heat mapper. Do all nodes have good contact with at least one other node? Do you have good coverage everywhere you need it?
See also: Mesh issues: Tweaking and troubleshooting
This guide is part of the All About Mesh series:
- What is mesh?
- Do You Need Mesh Wifi At Home?
- How Many Mesh Nodes Do You Need?
- How To Place Mesh Nodes For Optimal Wifi
- Mesh Wifi Issues: Tweaks And Troubleshooting